Chatbots have become an integral part of modern-day customer service, and the integration of AI-powered chatbots has revolutionised the way we interact with businesses. With the advancements in AI, chatbots are now capable of having human-like conversations and providing accurate responses to customer queries. Azure Bot Service is a cloud-based service provided by Microsoft that allows businesses to build AI-powered chatbots.

Integrating ChatGPT into an Azure Bot Service can be a great way to enhance the user experience and provide more personalised interactions. In this blog, we will discuss how to integrate ChatGPT, a powerful language model, with Azure Bot Service to build an intelligent chatbot
Prerequisites
- An Azure account
- Familiarity with Azure Bot Service
- Access to ChatGPT API
- Visual Studio
Create an Azure Bot Service
- Login to Azure Portal and Search for Azure Bot in marketplace.
- Provide details and Click on Review+create

- Click on Go to resource on deployment completion page.
Sign up for ChatGPT API
- Open ChatGPT portal and click on Sign Up.
Create Azure Function
- Open Visual Studio and click on Create a new project.
- Seach Azure Functions in Templates, Select and Click on Next
- Configure your next project and Click on next
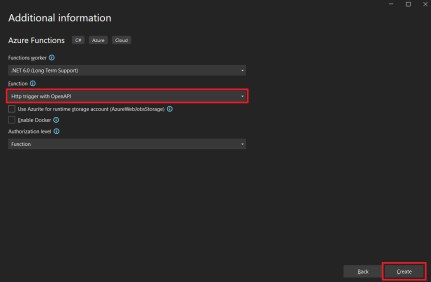
- Select “Http Trigger for OpenAI” for Function and Click on Create
- Right Click on Project and Click on Manage NuGet Packages…
- Search for OpenAI.ChatGPT Nuget and Click on install.

- Create a new configuration file and add ChatGPT API Key
Copy<appSettings>
  <add key="ChatGPTApiKey" value="YOUR_API_KEY_HERE" />
</appSettings>
Replace “YOUR_API_KEY_HERE” with your actual API key.
Integrate the ChatGPT API in Azure Function
- Now you can implement the ChatGPT API in your Azure Function. You can do this by creating a new instance of the ChatGPT class and calling the SendMessage method to send a message to the API. Here’s an example:
Copyusing OpenAI;

public static async Task<string> Run(HttpRequestMessage req, TraceWriter log)
{
    var chatGPT = new ChatGPT();
    var response = await chatGPT.SendMessageAsync("Hello, ChatGPT!");

    return response;
}
This code creates a new instance of the ChatGPT class, sends a message to the API with the SendMessageAsync method, and then returns the response.
- Integrate the Azure Function into the bot by adding a new dialog to your bot that calls the Azure Function to get a response from ChatGPT. Here’s an example:
Copyusing Microsoft.Bot.Builder.Dialogs;
using System.Net.Http;

[Serializable]
public class ChatGPTDialog : IDialog<object>
{
    public async Task StartAsync(IDialogContext context)
    {
        var httpClient = new HttpClient();
        var response = await httpClient.GetAsync("YOUR_AZURE_FUNCTION_ENDPOINT_URL_HERE");
        var message = await response.Content.ReadAsStringAsync();

        await context.PostAsync(message);

        context.Done<object>(null);
    }
}
This code creates a new dialog that calls the Azure Function to get a response from ChatGPT, and then posts the response to the user.
And that’s it! With these steps, you should be able to integrate ChatGPT into your Azure Bot. Of course, there are many ways to customise and extend this implementation, depending on your specific needs. But this should give you a good starting point.
Categories: Azure Bots, Azure Cognitive Service, ChatGPT
Leave a Reply